Part 5: Lens application (insertion) tools, techniques and troubleshootingUpdated 5 months ago
Always prepare your space first
- Prepare your space (towel or sink strainer) to prevent lens loss or breakage.
- Wash and towel dry your hands with moisturizer-free soap.
- Clean your plunger (if you're using one) with an alcohol prep.
What's the goal?
For some people, getting a scleral lens onto their eye correctly is easy and intuitive. For others, it can take weeks or months. We're all different, and some of us have larger lenses than others.
For those who struggle, it's about finding a technique, and perhaps new tools, to meet your needs. So if you're having trouble mastering insertion, you may need to figure out what your specific challenges are, as this can point the way to new approaches:
| Successful insertion means this: | Challenges you may face: |
|
|
Tools and techniques
Here are some of the many ways people insert their scleral lenses:
1. No-plunger methods
These methods work best with small diameter sclerals, e.g. 15mm.
"Tri-pod" method: Balance lens on three fingers
"O-Ring" method: Stabilize lens on finger with small rubber ring
2. Standard DMV Scleral Cup
- Applies suction to keep lens stable
- Squeeze to attach, squeeze to release
- Popular for all sizes of scleral lenses
Example:
3. DMV Vented Scleral Cup
- Low vision? Hollow design allows you to see light through it, which may help with centering.
- Best suited for small to medium. Larger lenses are more likely to need suction for stability.
Example:
(Note - for some reason they call the tool a "trimmed sucker", and clearly someone just hacked off the end of a regular scleral up, but you can buy them made this way. Pre-made ones are white.)
4. EZI Applicator Rings
- Lid spread: Helps by freeing up more fingers to hold the lids or from different angles
- Arthritis: Helps those who cannot hold or squeeze a DMV scleral cup
- Careful which size you choose!
Example:
5. See-Green Light & Stand
- Put your eye on the lens (not the lens on your eye)
- Helpful if you have hand tremors, difficulty centering, nervousness, flinching, etc.
- Can be used with DMV Scleral Cup, DMV Vented, or See-Green lighted inserter
- Optional lighted system helps with centering
Example:
6. See-Green Lighted Inserter
- Helps with centering, especially for those with low vision
- Can be used on its own for conventional insertion, or with stand

7. Luma-Serter PLUS
- Angled cup can be helpful for some low vision users
- Fits on a penlight for light-guided insertion
- Can be used on fingertip

8. S5 Mini & S5 Inserter
- S5 Mini (pictured); S5 Inserter has a telescoping arm
- Suction base to attach to counter or sink
- Light unit

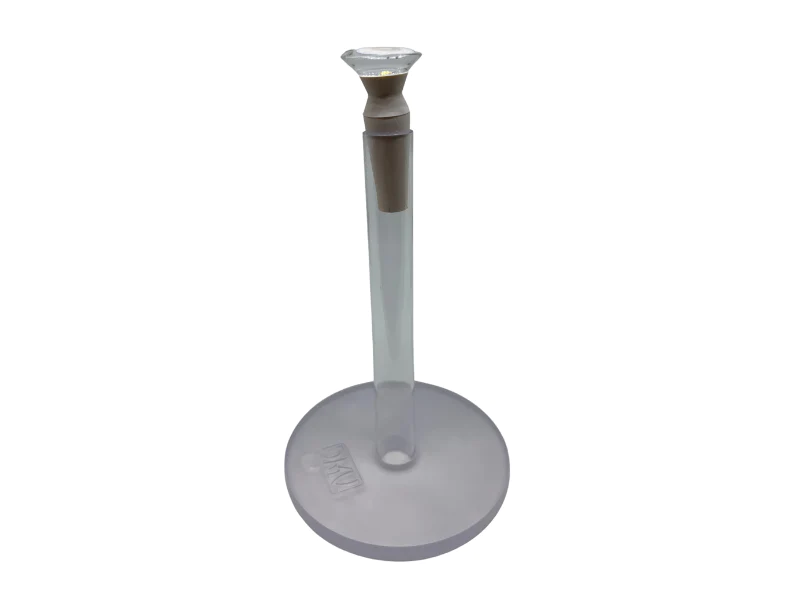
9. NEW! DMV Scleral Stand
DMV now makes an excellent low-cost stand, great started product! It is collapsible and comes with a DMV Vented Scleral Cup. You can shine a light at the clear base and tube for some light transmission through the scleral cup.
Troubleshooting
- Position: Are you tucking your chin, face parallel to the table/counter?
- Awkward: Do you feel like you're using the wrong hand, or your nose is in the way? Try switching hands. Some people use the same hand positions for both eyes, others switch.
- Stressed: Think positive, meditate, come to the scleral lens group for encouragement. You'll get there!
- Flinching (as plunger approaches): Calm self-talk and practice. Possibly consider Luma-Serter.
- Flinching (when saline hits eye): Warm the saline slightly - you won't be able to feel it when it touches the eye.
- Tremor: Use a stand.
- Bubbles? Usually from spilling saline due to either tremor or poor lid spread (see above for tips on both)
- Difficulty centering lens? Use a hollow inserter (eg vented) or an inserter with a light so that there is something to focus on.
- Saline spills, no matter what you do? Put something thicker in the lens (like a gel or geldrop) until your skills are more developed.
- Bubble confusion? Bubbles aren't always obvious. Using a high magnification lighted mirror, or possibly the i-Chek device (below) can help.
New User Mistakes
- Trying the same technique over and over when it's not working. It's important to figure out what the problem really is (see "Troubleshooting" above) so that you can find another approach.
- Trying too hard for too long. Don't go on so long that your eyes or eyelids are getting sore. Take a break, research techniques, call your doctor's office.
Struggling? Keep these in mind:
- YOU'RE NOT ALONE. Many people struggle learning to insert their lenses.
- ASK YOUR DOCTOR: You need support and training from your doctor's office. Some of you may need to be assertive and vocal about your needs.
- TRY ANOTHER TECHNIQUE: There is absolutely no one-size-fits-all approach to this problem.
- TRY ANOTHER TOOL: We provide lots of ideas in this tutorial, but make sure you involve your doctor in the process.
- WATCH ANOTHER VIDEO: Somewhere out there is a video of a technique that will work better for you.
- JOIN THE GROUP: Nothing like supportive friends in the journey so you can swap tips, commiserate about issues and celebrate the triumphs. Join My Big Fat Scleral Lens.
More videos
There are tons of videos. The ones above are just a few suggestions. Search YouTube on "Scleral lens insertion". It can be very helpful to review many videos to get fresh ideas about hand and finger positioning. We are all different and face different challenges! Try videos on these pages:
Ask your doctor
Speak up if things aren't working for you. Part of the scleral lens dispensing process must involve plenty of training until you are able to safely, consistently and successfully put your lenses in. Your lens provider bears
Red or irritated eyes or lids from the insertion process? Let your doctor know.
Can't get them in without bubbles? Let your doctor know.
IMPORTANT NOTE
FOR INFORMATIONAL PURPOSES ONLY. THIS GUIDE IS COMPRISED OF PEER-TO-PEER SUGGESTIONS, NOT MEDICAL ADVICE. CONSULT YOUR EYE DOCTOR WITH ALL YOUR EYE CARE AND LENS QUESTIONS.